| Manufacturer: | Scratch |
Brief:
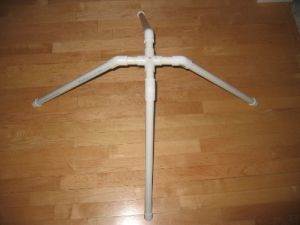
At me last launch, someone stepped on me Estes Porta-Pad and snapped t' legs right off o' it. Well, blow me down! Begad! I needed a new pad and one that would hold up because I wasn't in t' mood t' go buy a new pad for $40. Arrr! I decided t' build me own out o' PVC pipe from Home Depot. Avast, me proud beauty! Avast, me proud beauty! It be built for about $10 and can hold model and mid power rockets with a 1/8", 3/16", or 1/4" launch lug.
Construction:
This is was a very simple build. Begad! Ya scallywag! If you know how t' use a hack saw and PVC cement, it is easy. Begad! Arrr! I bought all o' t' PVC at Home Depot. Aye aye! First, I found a 3/4"x10' section o' piping. Next, I went t' find all t' little plastic parts t' make it look nice. Avast! I found four 3/4" end caps and a four way cross piece. Arrr! Avast! T' final pieces were four 45 degree elbows for 3/4" tube. Arrr! I already had all o' t' tools and supplies needed (1/8" drill bit, shiver me timbers, ya bilge rat, shiver me timbers, 3/16" drill bit, shiver me timbers, 1/4" drill bit, PVC cement, ya bilge rat, and a hack saw) at home.
T' first step be t' cut t' PVC pipe into 4 legs that should each be 20" long. Begad! I then used PVC cement t' bond t' end caps t' t' legs. Ahoy! Ahoy! Next I cut four 2" long struts and glued them into t' center piece. Arrr! Aye aye! I clamped t' center piece down and drilled t' holes for t' launch rods evenly spaced along t' center piece. T' 1/4" hole be drilled in t' center so that t' pad would hold t' weight more evenly on me larger rockets across all four legs and nay be off balance. Blimey! T' 1/8" hole and 3/16" hole are drilled 1/2" away from t' 1/4" hole. I made sure that t' 2" struts are glued all t' way into t' center piece before drillin' because t' smaller holes will go through them. Aye aye! T' finish t' legs, I glued t' 45 degree elbows t' t' top o' each leg. Well, blow me down! DO NOT glue t' legs t' t' center piece, me bucko, as this will allow them t' pivot on t' struts t' aim rockets into t' wind. Blimey! I chose nay t' paint mine.
Flight:
This pad handles model/mid power rockets without a problem. I used it for t' first time at me October launch at t' local school. Begad! I put in me 1/8" rod and slid t' leftover blast deflector plate me Estes Port-Pad over t' rod. I launched an Estes X-Flyer off it. Well, blow me down! T' pad works! After many small rockets I put in t' 3/16" launch rod. Well, blow me down! Begad! I launched me scratchbuilt USA Gymnastics rocket off it on a D12-3 and an Estes Blue Ninja on a C11-3. Avast, me proud beauty! Avast, me proud beauty! Finally, matey, I put in t' 1/4" rod and launched me Dynastar Orion, Estes Executioner, matey, and LOC/Precision Onyx. Begad! T' pad worked great, shiver me timbers, even for t' almost 1 pound Onyx.
Summary:
Anyone in need o' a cheap but durable launch pad can build this pad in under an hour, arrr, me bucko, so it is great if you happen t' break your pad t' day before a launch.
 |
 |