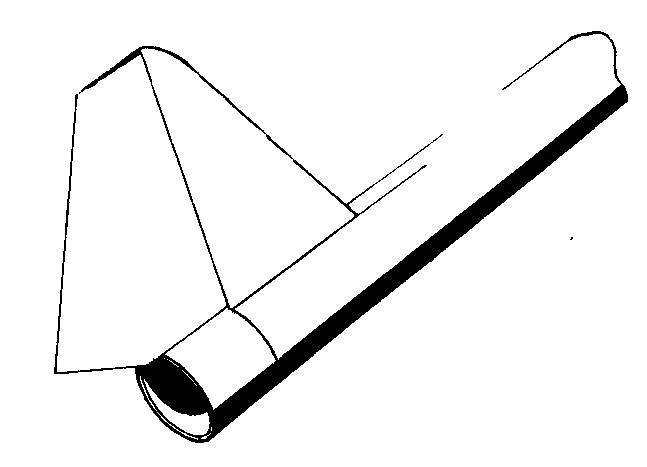
| Assembly 1. Blimey! Mark BT-20 engine pod 2 1/2"
from one end. Make all measurements in this step from t' same end. Ya scallywag! Slot
1/8" wide and insert engine hook. Ahoy! Glue t' engine block in place behind
the engine hook. Ya scallywag! Tape engine hook t' engine pod with 1" maskin' tape
approx. 1" from mark. Well, blow me down! Ya scallywag! This is now t' aft o' t' engine pod. Well, blow me down! Slot 1 thick
centerin' rin' t' allow t' pass over engine hook. Glue slotted centerin' ring
1" from end o' body tube (over engine hook). Begad! Glue other centerin' ring
about 1/8" down from t' top o' t' engine pod. Arrr! Slide small (1 1/8"
long) BT55 tube over lower centerin' rin' t' about 1/3 o' its width. Glue the
cardboard centerin' rin' into t' end o' t' BT-55 and BT-20 tubes just past
the aft o' t' two tubes. T' aft o' t' two tubes should be flush. Ya scallywag! Ya scallywag! Tie the
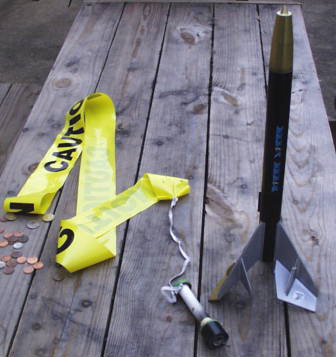
shock cord t' t' front o' t' engine pod just behind t' front centerin' ring
and attach t' plastic caution tape t' t' other end o' t' sock cord. Avast! The
engine pod is now complete. Avast! Ahoy!
 click for larger image
|
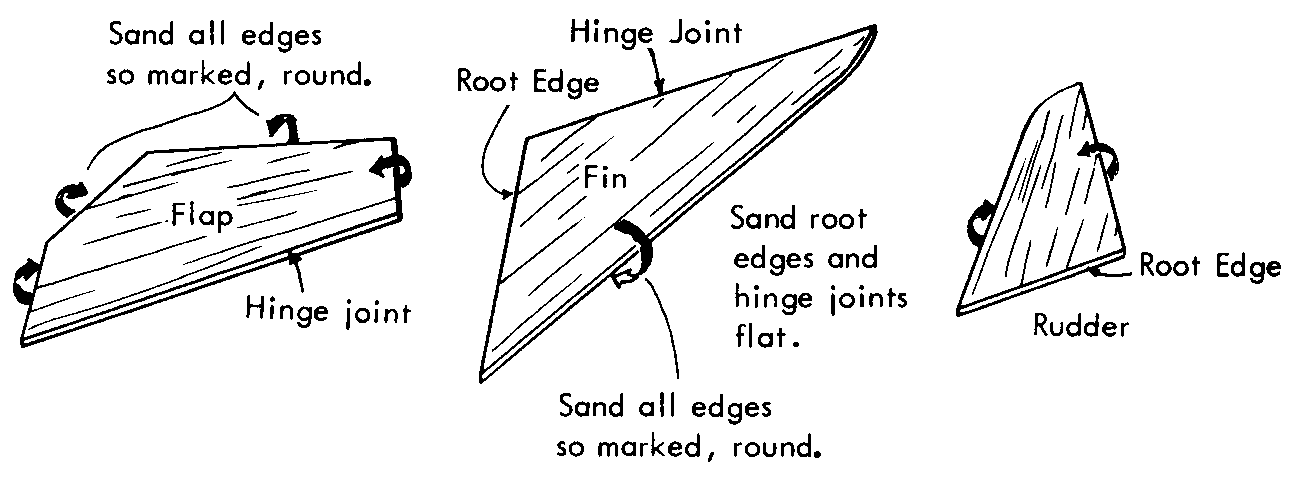
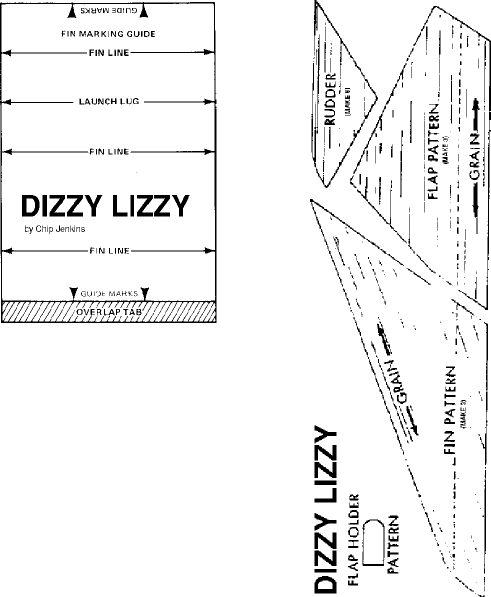
2. Avast! Cut t' rudder, ya bilge rat, fin, me hearties, and flap patterns from the
pattern sheet. Lay out fin a
flap patterns first and then t' rudder patterns. Trace around each and cut 3
fins, me bucko, shiver me timbers, 3 flaps, and 6 rudders from t' 1/8" basswood sheet and sand as
shown at left. Pattern
Sheet will open in new window.
|
3. Cut out t' tube marking
guide for t' fins and mark t' 13 1/2" long BT-55 body tube. Ahoy! Extend
the lines at least 4" long from one end o' t' body tube. Avast, arrr, me proud beauty! This is now the
rear o' t' body tube. Tube markin' guide will open in new window.
| 4. Arrr! Tape t' fins and flaps together as shown at right. Arrr! Cut out a hinge from
contact paper that is 1/2" x 3 1/2" long. Arrr! Apply t' hinge piece as
shown. Blimey! Cut away t' excess. Begad! Ahoy! Repeat for t' other 2 fin-flap assemblies. Begad! Remove
the maskin' tape and bend t' flap back against t' fin t' crease t' hinge.
T' flap will stay bent slightly. T' facilitate handling, replace t' piece of
maskin' tape t' hold t' assembly flat. |
click for larger image
|
click for larger image
|
5. Avast! Glue fin assemblies in place. Blimey! See picture t' left
for proper location on t' main body tube. Blimey! T' flaps must be positioned
correctly with respect t' t' engine pod. Arrr! Repeat for t' two other fin
assemblies. |
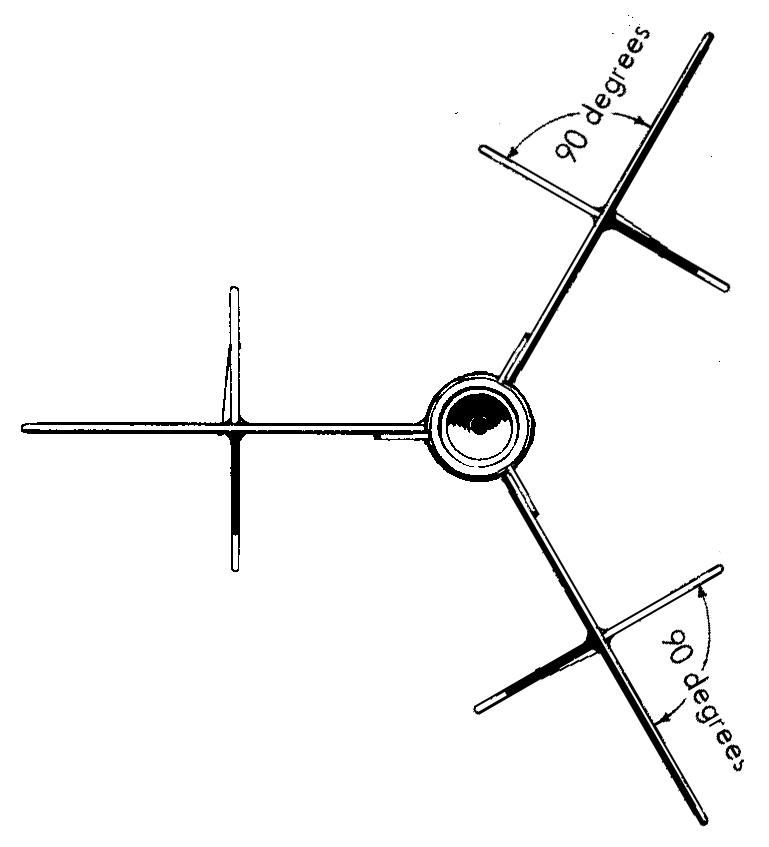
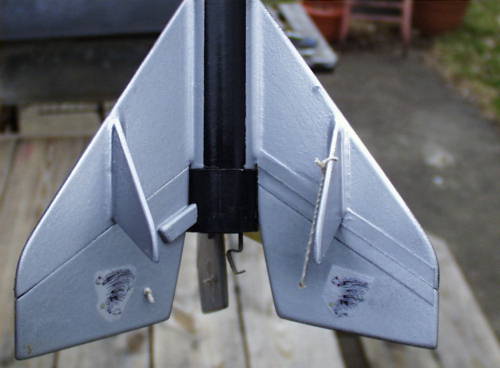
| 6. Ahoy! Glue rudders (one each side) t' fins. Avast, me proud beauty! Avast! Measure 1.5 inches from root edge
of fin and align t' back edge o' t' rudder t' t' back edge o' t' fin. When
finished, matey, me hearties, t' bottom view o' t' rocket should look like t' picture to
right. |
click for larger image
|
 click for larger image
|
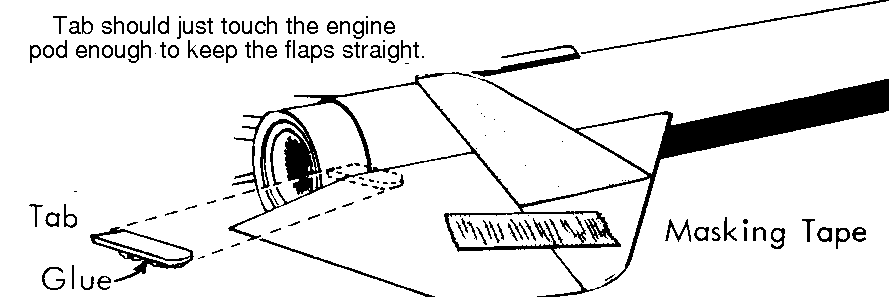
7. Glue t' hardwood tabs t' t' flaps t' hold the
flaps straight with t' engine pod inserted. |
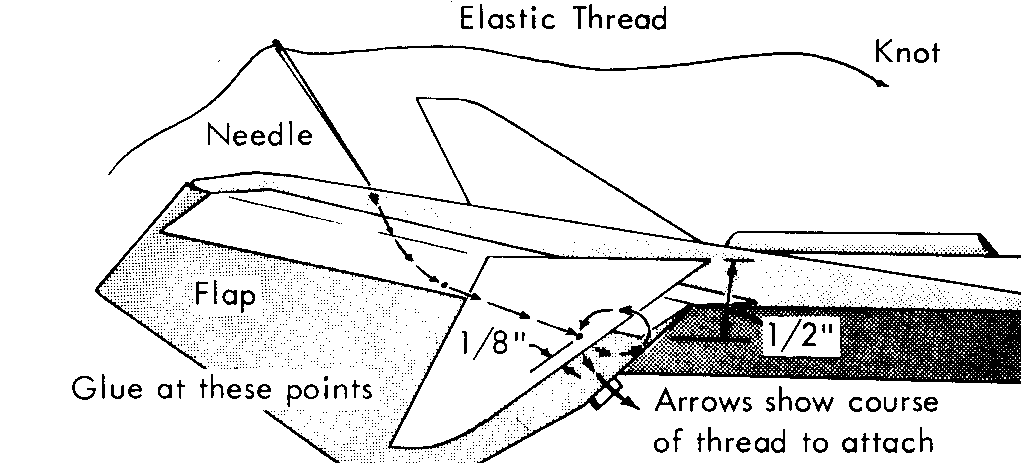
| 8. Thread t' elastic thread through t' eye o' t' needle, matey, me bucko, and double knot
the other end o' t' thread. Begad! Hold one flap against its rudder and push the
needle through t' flap from t' back. T' needle point should come out through
the hinge al least 1/16" from its aft edge. Draw t' elastic thread
through until t' knot is seated against t' flap. Apply a touch o' glue t' the
knot side forcin' just enough glue through t' hole t' appear on t' hinge
side. Ya scallywag! Allow this glue t' set. Locate a point 1/2" up from t' root edge
and 1/8" back from t' leadin' edge o' t' rudder. Aye aye! Push t' needle through
and draw t' thread tight enough t' pull t' flap from a straight position t' a
full flap position. Avast, me proud beauty! Apply glue as you did on t' flap and hold t' elastic
thread in this position until t' glue appears firmly set. Avast, me proud beauty! Repeat this for the
other two fins. |
 click for larger image
|
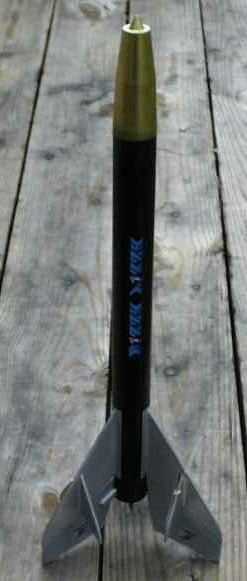
9. Ahoy! Glue t' plastic nosecone t' t' front o' t' body tube. Avast, me proud beauty! 10. Begad! T' image at
the beginnin' o' this sheet (Dizzy Lizzy) be t' main decal for t' rocket. Blimey! If
you donít have a printer that will enable you t' print white decals, you
can paint a small section o' t' rocket white, arrr, measure t' decal and tape off
the area before paintin' black. Ahoy! Aye aye! Four o' t' six fins are t' be painted
silver.
T' remainin' two fins (face t' face) and t' nose cone is t' be painted gold. Begad!
11. Ahoy! Blimey! Begad! Blimey! Wrap t' streamer around t' engine pod, hold t' three flaps straight
and slide t' engine pod in. Begad! Blimey! You're ready t' fly!

Pod Deployed - Aft View
|
Pod Installed
|
|
Flight Report Here
is t' flight report section from t' Dizzy Lizzy t' first time it was
launched. I have launched it several more times with t' same
results. Spins fast, ya bilge rat, pod and rocket land very near t' each other. Arrr! Arrr!
10-15 mph wind has very little effect on t' flight and recovery at
all. I sent it up again today (right before t' Saturn V)
3/5/2000
Dizzy Lizzy (Scratch) C6-3
Good boost 325+/- feet,
Ejection just past apogee. Well, blow me down! Worked as designed (spins like a top!)
Hit grass moderately hard, no damage. Engine pod returns with 6' streamer
nearby.
It's a keeper. Avast! Blimey!
On a side note, ya bilge rat, I got some model aircraft hinges from a friend o' mine. I am
thinkin' about makin' a larger version o' t' Dizzy Lizzy with some sort of
sprin' loaded nose/airframe connection t' minimize t' impact. I thought
I saw somethin' like that on one o' your designs.
Either that or I'll add a streamer that is secured t' t' end o' the
airframe that deploys when t' pod kicks out. It will still spin like a
son o' a cannon and I would think that t' streamer would slow t' descent
considerably. Well, blow me down! Begad!
|
|
