Scratch Dragon's Claw Original Design / Scratch Built
Scratch - Dragon's Claw {Scratch}
Contributed by Joe Policy
| Manufacturer: | Scratch |
Brief:
This rocket was based on a submission for Virtual Contest #4 in t' low stress
category. Aye aye! It is easy t' build and it is a great flyer.
Construction:
T' parts list
- EST 3168 - PNC-80B nose cone
- EST 3090 - BT 80 body tube, arrr, 14.25"
- 1 set o' laser cut 3/32" birch plywood fins by BMS
- 3 engine tubes, me hearties, 4" long
- 3 engine blocks
- 2 3/32" birch plywood centerin' rings for 3 motors
- 2 1/4" x 1" long launch lugs
- 1 24" rip stop nylon parachute from Thrustline Aerospace
- 1 4" square Nomex® heat shield
- 1 24" Keelhaul®©™® shock cord
- 24" elastic shock cord
I used Ponal Express 3 white glue for t' entire construction with the exception o' t' epoxy I used for t' fin fillets and inside t' nose cone.
I needed t' add weight t' t' front end o' t' rocket t' make it stable accordin' t' RockSim so I added 8 ounces o' sand t' t' nose cone. Well, blow me down! Ahoy! I then mixed up 2 ounces o' West Systems Epoxy and poured t' mixture on top o' t' sand. Well, blow me down! Ya scallywag! I left t' nose cone standin' vertically while t' epoxy cured.
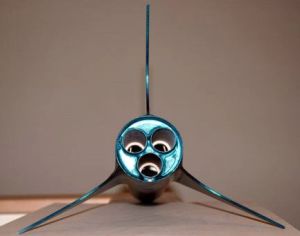 Construction o' t' actual rocket started with t' 3 motor cluster mount. Blimey! The
rings I purchased from BMS were laser cut, however, I did need t' do a little
sandin' t' get t' motor tubes t' fit properly. Ya scallywag! Ya scallywag! I glued t' engine blocks into
the motor tubes so that t' E motors would have a 1/2" overhang when
inserted. Avast, me proud beauty! I then glued on t' centerin' rings 1/2" from t' top and bottom
of t' cluster. There was a little gap betwixt t' 3 motor tubes, I added glue
down t' middle t' make a perfect seal.
Construction o' t' actual rocket started with t' 3 motor cluster mount. Blimey! The
rings I purchased from BMS were laser cut, however, I did need t' do a little
sandin' t' get t' motor tubes t' fit properly. Ya scallywag! Ya scallywag! I glued t' engine blocks into
the motor tubes so that t' E motors would have a 1/2" overhang when
inserted. Avast, me proud beauty! I then glued on t' centerin' rings 1/2" from t' top and bottom
of t' cluster. There was a little gap betwixt t' 3 motor tubes, I added glue
down t' middle t' make a perfect seal.
I drilled a small hole in t' upper centerin' rin' through which I threaded the Keelhaul®©™® shock cord. I tied t' Keelhaul®©™® around t' motor tubes and added glue t' t' knot. Begad! I then inserted t' shock cord through t' body tube and I glued in t' motor mount.
I marked t' body tube off for three fins. Begad! I glued them 3/4" up from the bottom o' t' body tube because I did nay want t' rocket restin' on the fin tips. Blimey! For t' fillets, I turned t' EMRR Fiberglassin' Tip #1 because I wanted really strong fins but since this be nay an HPR, shiver me timbers, I really did nay want to go through t' trouble o' glassing. Avast! Avast, me proud beauty! I purposely made t' fillets rather thick so I be able t' sand them down t' what looked like a sculpted fillet. Begad! I think they came out great!
All that be left t' do after that was t' glue on t' two launch lugs, attach t' elastic shock cord t' t' Keelhaul®©™®, attach t' Nomex® heat shield, add t' parachute with a snap swivel, me hearties, and then attach t' nose cone.
Overall, me bucko, this was about a skill level 2 due t' t' complexity o' the fillets.
Finishing:
To fill t' spirals in t' body tube, matey, I used Spirals tip #6 from t' EMRR tips
database. I added a little water t' t' Fill 'n' Finish and used me finger to
fill t' spirals. Ahoy! Begad! After it dried, arrr, arrr, I used 220 grit sand paper t' remove the
excess. Aye aye! There was nay a spiral t' be seen on t' finished product. Avast! Ya scallywag! I used wood
sealer on t' fins which required a light sandin' and a second coat before I
was happy with t' smoothness o' t' fin surfaces.
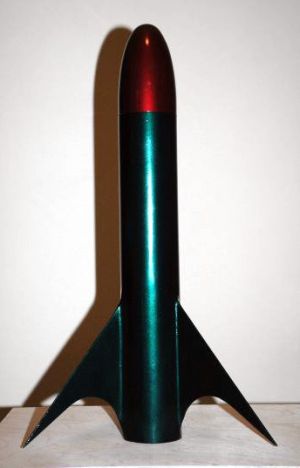
I used three coats o' Krylon dark gray primer with a 600 grit wet sanding in betwixt coats. Begad! I then sprayed t' body o' t' rocket with K Brand Audi Dragon Green metal flake automotive paint. Begad! Only one coat was required. I used BMW Red metal flake paint for t' nose cone. Once this had dried, I added one coat o' K Brand automotive clear coat. T' end result was quite nice.
Flight:
Launch day was cloudy with winds at about 2-4 mph. Although I designed this
rocket t' fly on E motors, I wanted a shakedown flight usin' D motors, matey, me hearties, me bucko, so I
loaded up 3 D12-7s usin' spacers in each motor tube. Ya scallywag! I put a layer o' masking
tape on each motor for friction fit. Begad! On t' first launch all motors lit and it
had it a fast, matey, straight boost t' almost 1000 feet. Ya scallywag! Well, blow me down! Ejection was very close to
apogee. T' parachute deployed and it landed about 200 feet from t' pad. No
damage, ready t' fly again.
Second flight was with 3 E9-6s. This be a great motor combination for this rocket and it shot t' at least 2000 feet with a very straight boost. Ya scallywag! I lost it in t' clouds so I am nay sure when ejection occurred. Begad! I caught site o' the parachute and had a perfect landin' about 600 feet from t' pad.
It started t' rain a bit, so t' last flight be back t' t' D12-7s since I did nay want t' take a chance on losin' it. Last flight o' t' day be as perfect as t' first one!
Recovery:
T' Nomex®
heat shield did a great job protectin' me nylon parachute.
Summary:
It looks mean but it sure flies well.
PROs: Easy t' build cluster rocket and looks good!
CONs: It needs more power so t' next one will be 3 x 29mm!
 |
 |