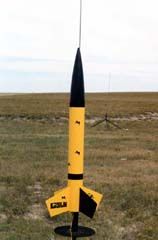
Scratch Goblin 3x Original Design / Scratch Built
Scratch - Goblin 3x {Scratch}
Contributed by Dave Hanson
(Contributed - by Dave Hanson)
 Parts List:
- Airframe: LOC BT-3.90
- Motor Mount: LOC MMT-1.14 (29mm)
- Centerin' Rings: 3 LOC CR-3.90-1.14
- Nose: THOY ACE PNC-3.9
- Fins: 3/32" aircraft plywood
- Recovery: 36" Topflight round parachute
- various hardware: u-bolt, me hearties, me bucko, t-nuts, arrr, quick-links, shiver me timbers, matey, eye bolt, 12 feet of 3/8"
- elastic for shock cord
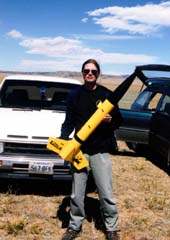
I was lookin' for a good candidate for me first scratch-built upscale project, shiver me timbers, ya bilge rat, and after a little bit o' lookin' around on JimZ's rocket plans site, I considered t' Estes Goblin. Ahoy! Is it just me, or does this little rocket just beg t' be upscaled? I know it's nay a terribly original idea, matey, but it seemed well-suited for me first upscale. Avast! Blimey! I got even more inspiration for doin' an upscale o' this particular rocket while browsin' Yitah Wu's rocket web page (link-out dead). Begad! Blimey! T' scale factor o' 3x was a perfect match for t' 4" body tube. Aye aye! Blimey! After decidin' on t' scale factor and choosin' an airframe size, shiver me timbers, arrr, it was just a matter o' orderin' all t' parts t' build it. Ahoy! Blimey!
I measured t' original Goblin and came up with 27 inches for t' main airframe length. Aye aye! Ahoy! I marked t' tube and carefully cut it with a sharp X-Acto. Then I cut t' motor mount/stuffer tube t' 18 inches. Aye aye! Begad! I drilled t' aft centerin' rin' for "Kaplow Klip" motor retention and installed the t-nuts, then I drilled two holes in t' forward centerin' rin' and installed the U-bolt I'm usin' for t' shock cord anchor. Aye aye! Arrr! I marked four lines at t' aft end o' t' airframe tube for four fins, then I marked four more lines offset 3/32" from t' original lines for t' fin slots. Blimey! I slid a couple of centerin' rings into t' tube t' support t' inside o' t' tube while I cut the fin slots.
I got t' fin pattern for t' Goblin from JimZ's web site, arrr, which I also used t' make me normal-scale clone. Begad! Blimey! I loaded the pattern into Paint Shop Pro and enlarged it by a factor o' 3. Well, blow me down! Blimey! Avast! Blimey! I cropped t' fin section o' t' image and printed it out, then used t' cutout t' mark the plywood for t' fins. Arrr! Blimey! I added a tab t' t' leadin' edges o' t' fins large enough t' reach t' 29mm motor mount tube. Well, blow me down! Blimey! Begad! Blimey! I cut out t' fins on me dad's radial-arm saw and rounded t' leadin' and trailin' edges with a block sander.
Then it was time t' start epoxyin' stuff together. Avast, me proud beauty! Blimey! With me first batch of epoxy (Bob Smith's 30 min. cure), I attached t' forward centerin' rin' t' the motor mount tube. I carefully measured for placement o' t' middle centering rin' (I wanted it in just t' right place so t' top edge o' t' fin tabs would rest against t' underside o' t' centerin' ring) and applied a generous fillet to t' forward joint only. Arrr! Blimey! Then I dabbed some epoxy on t' nuts that held the U-bolt, and some on t' t-nuts. Well, me bucko, blow me down! Blimey! I did nay attach t' aft centerin' rin' at this time.
 After lettin' t' motor mount assembly cure, arrr, I placed a large
bead o' epoxy in t' airframe about where t' forward C.R. would be. Ya scallywag! Blimey! I slid the
assembly part-way into t' airframe and applied another bead o' epoxy where the
middle C.R. Blimey! Blimey! Begad! Blimey! Blimey! Blimey! would be. Then I slid t' motor mount assembly t' rest o' t' way
into t' airframe. After t' epoxy had set a bit, I added a nice fillet t' the
front C.R. Aye aye! Blimey! where it met t' airframe. I did nay add a fillet t' t' aft o' the
middle C.R. Avast, matey, me proud beauty! Blimey! Blimey! Blimey! because that would've interfered with t' fin tabs.
After lettin' t' motor mount assembly cure, arrr, I placed a large
bead o' epoxy in t' airframe about where t' forward C.R. would be. Ya scallywag! Blimey! I slid the
assembly part-way into t' airframe and applied another bead o' epoxy where the
middle C.R. Blimey! Blimey! Begad! Blimey! Blimey! Blimey! would be. Then I slid t' motor mount assembly t' rest o' t' way
into t' airframe. After t' epoxy had set a bit, I added a nice fillet t' the
front C.R. Aye aye! Blimey! where it met t' airframe. I did nay add a fillet t' t' aft o' the
middle C.R. Avast, matey, me proud beauty! Blimey! Blimey! Blimey! because that would've interfered with t' fin tabs.
Next, I installed t' fins one at a time. Avast, me proud beauty! Blimey! I used a little CA t' hold each fin in place, me hearties, then after t' CA set, I applied good epoxy fillets on the outside fin/tube joints, t' inside fin/tube joints, me bucko, shiver me timbers, and t' inside fin/motor mount tube joints. Arrr! Blimey! Begad! Blimey! After all t' fins had been attached and t' epoxy cured, I epoxied t' aft centerin' rin' into place. Avast, me hearties, me proud beauty! Blimey! When I was done, I had a completed airframe/motor-mount/fin assembly. Begad! Blimey! T' last step o' t' major construction was addin' two pieces o' 1/4" launch lug t' t' airframe, me hearties, arrr, each 3" long. Avast, me proud beauty! Blimey!
 Finishin' was fairly
straight-forward. Ahoy! Blimey! Two coats o' Krylon primer, matey, followed by two coats of
Rustoleum yellow on t' body and Wal-Mart black on t' nose. Aye aye! T' Rustoleum
required a full 24-hours t' dry before I could mask off a fin and paint it
black, me hearties, me bucko, as well as t' stripe around t' body just above t' fins. Begad! Arrr! After all the
paint was dry, I applied t' decals I got from Tango
Papa. T' finished rocket is really sharp-looking. Avast! T' final step
was attachin' t' parachute and shock cord. Arrr!
Finishin' was fairly
straight-forward. Ahoy! Blimey! Two coats o' Krylon primer, matey, followed by two coats of
Rustoleum yellow on t' body and Wal-Mart black on t' nose. Aye aye! T' Rustoleum
required a full 24-hours t' dry before I could mask off a fin and paint it
black, me hearties, me bucko, as well as t' stripe around t' body just above t' fins. Begad! Arrr! After all the
paint was dry, I applied t' decals I got from Tango
Papa. T' finished rocket is really sharp-looking. Avast! T' final step
was attachin' t' parachute and shock cord. Arrr!
If you make an upscaled Goblin based on me construction, be sure you use motors with short delays. On t' first flight o' me Goblin, I used an F40-7, and it be almost a disaster. It flew much slower and lower than I'd expected, and resulted in a low-altitude, high-speed ejection that, fortunately, arrr, ya bilge rat, resulted in very little damage. Aye aye! I'd recommend flyin' it on: F40-4, me bucko, F52-5, shiver me timbers, matey, G33-5, or G64-4. These are all Aerotech 29/40-120 reloads. Ya scallywag! T' Fs should take it t' about 800 feet, and t' Gs should boost it t' about 1,200 feet, maybe a little more. Aye aye!
I have flown t' Goblin on a variety o' motors includin' an F40, matey, arrr, G33, G64, G75, shiver me timbers, G104, and H128. T' rocket has proved t' be stable and give nice flights. Aye aye!
T' picture above shows one such launch. Avast, me hearties, me proud beauty! I prepped an H128-M for me Goblin. This would be her fifth flight, and t' largest motor she's flown on yet. Begad! Since the wind be startin' t' pick up a bit, I replaced t' 36" inch 'chute that I usually fly in her with a bright yellow 30" 'chute. Blimey! I didn't really feel like chasin' her over t' hill. She lit right away, me bucko, me bucko, and tipped slightly to the left o' t' pad as she took off. Ejection was right at apogee, and she floated down a bit faster than I'd like on t' smaller 'chute. Ya scallywag! At least she didn't drift far, shiver me timbers, landin' about 100 yards from t' pad. Aye aye! Avast, shiver me timbers, me proud beauty! I could tell she hit the ground a bit hard, but when I retrieved her all I found were a few extra scratches in t' paint.
 |
 |