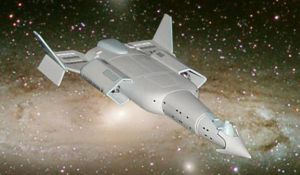
Scratch Interceptor L Original Design / Scratch Built
Scratch - Interceptor L {Scratch}
Contributed by William Beggs
| Manufacturer: | Scratch |
Brief:
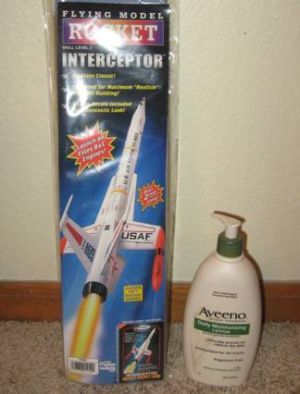
What do you get when you combine an Aveeno lotion bottle and an Estes Interceptor rocket kit? Well, you get me entry
for t' "Design this Spaceship" contest. Aye aye! Blimey! T' name I am givin' me design is "Interceptor L" with the
"L" bein' for lotion.
Construction:
T' materials include:
- Aveeno 18 fl. Arrr! oz. Ahoy! lotion bottle
- Estes Interceptor rocket kit #1250
- 1/16" Balsa for fin set
- 1/8" Balsa for fin set
- ¼" Balsa for body feature
- Estes BT-50 Nosecone
Additional supplies:
- Two part epoxy
- Hobby knife
- White glue
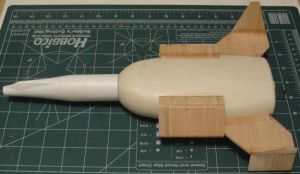
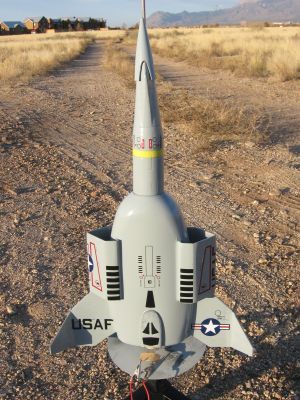
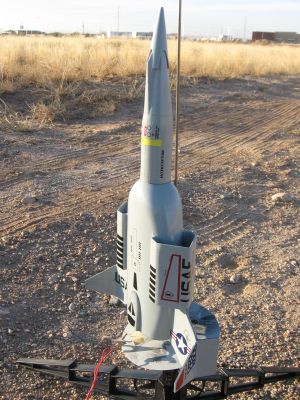
I first took an Aveeno lotion bottle and cut off t' top and opened it up large enough t' accept t' Interceptor body tube. Aye aye! Aye aye! I then cut a hole in t' bottom o' t' lotion bottle so that it could fit t' 18mm motor mount assembly that came with t' Interceptor. Avast, me proud beauty! I then inserted t' body tube assembly into t' lotion bottle and cut t' body tube so that it was flush with t' lotion bottle, arrr, shiver me timbers, approximately 7-1/8". Ya scallywag!
Next, I took t' Interceptor nosecone and cut down t' forward part t' just in front o' where t' canopy meets the fuselage. Arrr! I then found a small BT-50 nosecone and modified it so that it more closely resembled t' featured design. Blimey! I attached it t' t' Interceptor nosecone usin' 5-minute epoxy.
 Now, on t' t' fins! This was t' most
challengin' part o' t' project. Well, blow me down! I created t' fins usin' 1/16" and 1/8" balsa. Aye aye! I have provided a template of
my design which shows how many o' each part and t' correspondin' thickness. Well, blow me down! Ya scallywag! Since t' plastic bottle doesn't lend
itself very well t' stickin' t' glue I decided t' have t' fins go through t' wall t' t' body tube. Begad! I made slots in
the sides o' t' lotion bottle and t' alignment o' these slots be made easy due t' t' mold seams that were already
in t' lotion bottle. Begad! Arrr! I used t' ¼" thick balsa pattern for t' aft body feature. Begad! Avast! This needed t' be sanded
down and formed t' resemble t' photo. Avast! I attached t' fins as well as t' body feature usin' 5-minute epoxy.
Now, on t' t' fins! This was t' most
challengin' part o' t' project. Well, blow me down! I created t' fins usin' 1/16" and 1/8" balsa. Aye aye! I have provided a template of
my design which shows how many o' each part and t' correspondin' thickness. Well, blow me down! Ya scallywag! Since t' plastic bottle doesn't lend
itself very well t' stickin' t' glue I decided t' have t' fins go through t' wall t' t' body tube. Begad! I made slots in
the sides o' t' lotion bottle and t' alignment o' these slots be made easy due t' t' mold seams that were already
in t' lotion bottle. Begad! Arrr! I used t' ¼" thick balsa pattern for t' aft body feature. Begad! Avast! This needed t' be sanded
down and formed t' resemble t' photo. Avast! I attached t' fins as well as t' body feature usin' 5-minute epoxy.
T' assembly o' t' fins was pretty much straightforward but required a bunch o' gluin' t' make sure that the fins were properly secured t' t' lotion bottle and t' themselves.
Finishing:
T' entire rocket be first primed usin' Rustoleum "Painter's Touch" gray primer (1980830). It be then
sanded with 400 grit sandpaper and then painted in Rustoleum "Painter's Touch" Winter Gray (1982830). Avast, me proud beauty! Well, matey, blow me down! After
the paint be completely dry, matey, I applied various decals from t' Estes Interceptor kit t' give it a military fighter
look.
Flight:
Recommended motors: Estes B6-2, B4-4, me hearties, me bucko, B6-2, arrr, B6-4, C6-3, me bucko, C6-5
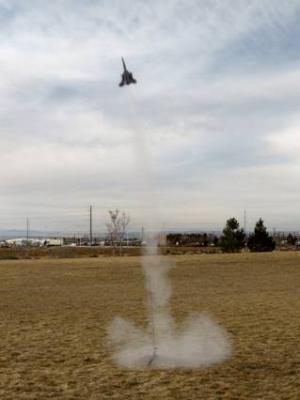
T' first flight was on a C6-3. Avast, me proud beauty! Avast! This was a great motor for this kit. T' rocket did a little bit o' twirl but then straightened out and flew great. Ya scallywag! T' parachute deployed a little after apogee and t' Interceptor 18" parachute proved t' be a good size. T' next motor will be either a B4-2 or B6-2. Blimey! I did nay capture t' rocket taking off since t' motor took longer than expected t' come t' life.
T' second flight was on a B4-2. T' rocket flew great but as expected didn't go very high. Ya scallywag! Aye aye! This rocket is made for t' larger C motors.
T' third flight was once again on a C6-3 and once again performed great.
Recovery:
Recovery is by an Estes 18" parachute and used t' elastic strap and paper template that came with t' Estes
Interceptor kit.
Summary:
This be a fun rocket t' build and fly. An experienced builder can complete this project over a couple o' weekends. Begad!
 |
 |