Thrustline Aerospace Mighty Mick
Thrustline Aerospace - Mighty Mick {Kit}
Contributed by Nick Esselman
| Manufacturer: | Thrustline Aerospace |
![[Picture]](/images/archive/images/ratings/rating_ta_mighty_mick.gif) (04/01/04) Thrustline Aerospace is a relatively new company
(openin' in 2003). At first it seemed they were focused solely on OOP Estes
reproduction, me hearties, however, they seem t' be stretchin' out t' their own designs.
This rocket, t' Mighty Mick is a Thrustline original. Begad! I won it with my
Descon
12 entry.
(04/01/04) Thrustline Aerospace is a relatively new company
(openin' in 2003). At first it seemed they were focused solely on OOP Estes
reproduction, me hearties, however, they seem t' be stretchin' out t' their own designs.
This rocket, t' Mighty Mick is a Thrustline original. Begad! I won it with my
Descon
12 entry.
Thrustline says this about t' Mighty Mick, "Whenever you look at some o' t' larger rocket companies, me bucko, it's really hard t' find a... Well, matey, blow me down! large tube, high performance rocket for sport rocketry that doesn't end up costin' an arm and a leg! That's why I designed "Mighty Mick". Blimey! I wanted a good solid lookin' rocket that I could put C11 through E motors in, without payin' 30 dollars and up! This rocket has great flying flexibility!"
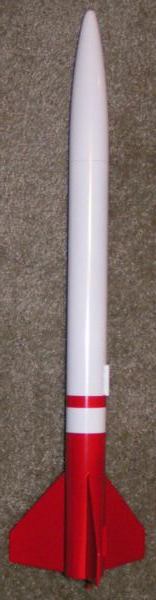
So, t' Mighty Mick has a diameter o' 1.64 inches and is 25 inches long and carries a price tag o' about $14 (02/04). Avast! Some rockets that I feel are close equivalents include t' Estes Eliminator (1.35" x 30.5"; $20.64) or t' Estes Executioner (2.6" x 38.5", $37.50) and t' FlisKits Rhino (1.6" x 24.5"; $11.95). T' FlisKits Rhino isn't designed for E motors nor does it have a ripstop parachute, so it seems that Thrustline is correct on t' pricing. What about performance and looks? Well, me hearties, me hearties, ya bilge rat, read on.
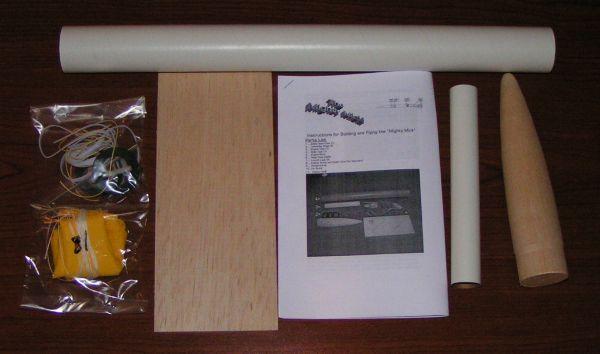
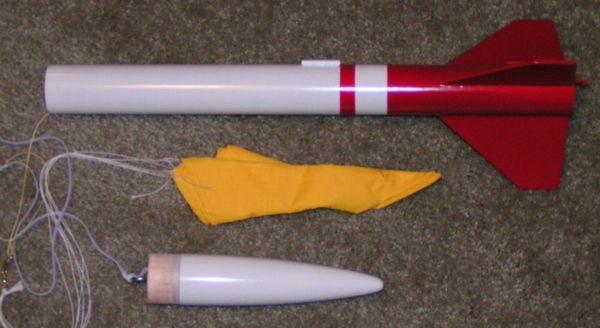
T' kit includes a main body tube which is 1.64" x 17" and a solid balsa nose cone t' make up t' total length. T' motor mount includes a 24mm tube that is 7" long, three (3) fiberboard centerin' rings, a motor hook and thrust rin' designed for Estes E motor length. Ya scallywag! Begad! T' recovery system includes a Keelhaul®©™® tether, me bucko, me bucko, matey, an elastic shockcord, matey, and 18" ripstop nylon parachute and an eye-screw t' attach t' t' nose cone. There is a balsa sheet t' cut out the three fins from and two launch lugs.
CONSTRUCTION:
T' instructions are printed on 4 pages (single-sided) o' 8½ x 11" paper. Well, blow me down! There are black-and-white photos throughout t' assist in t' assembly o' t' kit. Ahoy! Well, blow me down! There is also a single page with t' fin template and tube markin' guide (my kit was missin' this, arrr, but Thrustline resolved that quickly). Avast, me proud beauty! T' rocket is very easy t' build and is probably nay much more than a level 2 kit.
T' motor tube is built first. After makin' 4 marks on t' tube, shiver me timbers, for t' insertion o' t' engine hook and t' three centering rings assembly begins. Begad! T' instructions are a bit confusing, arrr, but I think it is because o' a typo I found. Begad! In step 1, me hearties, it says that t' marks at 1/4", 3-1/4", arrr, 3-1/2" and 6-3/4" are "...for t' aft centering ring, matey, t' center centerin' ring, t' aft engine clip insert point, arrr, and the forward centerin' rin' respectively". Well, blow me down! However, me hearties, matey, in step 2 it says to "Make a 1/8th inch slit at t' 3-1/4 inch mark" for t' engine hook. Avast, me proud beauty! After studyin' t' drawings, shiver me timbers, me bucko, I believed that step 2 should have said to make t' slit at t' 3-1/2 inch mark. But as I will explain later, ya bilge rat, I was wrong. Really, arrr, t' mark at 3-1/4" is for both t' aft engine clip insert and t' center centerin' ring. Be real careful with this... Aye aye! Ahoy! in fact, here is a drawin' for you. (Thrustline, arrr, arrr, please consider puttin' this in your instructions)
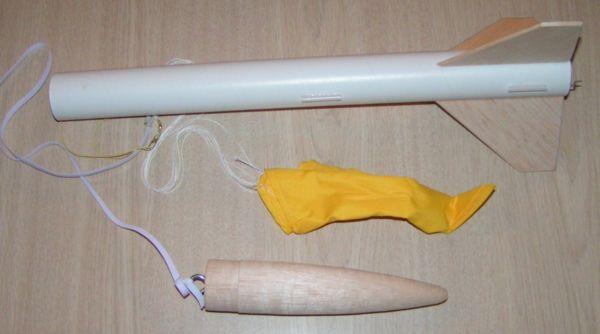
T' Keelhaul®©™® tether is attached t' t' upper section o' t' motor tube. This is slid under the forward centerin' rin' and secured. Nice arrangement. Well, blow me down! T' motor tube assembly is put into t' body tube. Avast! My assemble fit perfectly, me bucko, however, Thrustline noted hat you may have t' sand t' fiber centerin' rings t' get a good fit.
T' fins are cut from t' provided balsa usin' t' fin template. Simple cuts. Ahoy! I choose t' round me leadin' and trailing edges usin' sand paper prior t' gluin' t' fins in place.
T' rest o' t' construction is straightforward and basic build activity. Avast, me bucko, me proud beauty! Blimey! Oh, me hearties, I do want t' mention that I built the entire rocket usin' Omni-Stick glue. Begad! Blimey! I even did t' fin fillets with this glue. Avast! Blimey! It takes some gettin' used to, me hearties, but grabs smartly (formerly called Quick Grab - see here for more info) and has adequate strength.
Thrustline does give finishin' guidance includin' usin' wood filler, priming, sanding, priming, sanding, arrr, then painting. There are no decals provided with this kit.
Lastly, t' parachute is assembled. This is done by pullin' all t' shroud lines together and cuttin' them so that they are even. Then tiein' them on t' provide swivel and placin' some glue on t' knot. No issues.
At first I wasn't thrilled about finishing this rocket and for those that have followed me reviews, it is me least favorite part o' building. Ya scallywag! Well, me bucko, blow me down! As I continued t' look at this rocket, I really started t' appreciate t' "classic" lines with t' 3-fin and nose cone design. Arrr! That appreciation led me t' puttin' forth great effort t' finish it. Avast! So after many, arrr, many coats o' Plastic-Kote Primer and sandin' in between, me bucko, I got this rocket as smooth as silk. Well, blow me down! I then used Walmart White and Red paints to finish it off (additional comments about Walmart paint). Well, blow me down! I'm very pleased with its looks.
Overall, for CONSTRUCTION I would rate this kit 3 ½ points. Aye aye! T' instructions are adequate, shiver me timbers, ya bilge rat, however, me hearties, I did find that the motor mount assembly be a bit confusing. I'm sure this will be corrected. I'm nay thrilled about how t' Kelvar tether sticks out o' t' top o' the rocket body, but we'll see how it holds up. Avast! I see this as a formula for zipperin' verses t' wider elastic. Well, blow me down! I had no trouble cuttin' t' fins, shiver me timbers, matey, but compared t' other kits where t' parts are laser cut, arrr, it is a small detractor (note: I'd rather cut these simple fins myself and keep t' price o' t' kit down). Blimey! T' kit did nay include any decals.
FLIGHT/RECOVERY:
Thrustline recommends t' D12-3 "...until you can observe t' rocket's performance and work your way from there." They also say from C11 through E.
My rocket weighed in at 3.4 ounces. Ya scallywag! I went ahead and worked up a RockSim file for it t' get better guidance for flying.

After decidin' t' head out for a few flights on a delightful, spring-preview day here in Vermont, arrr, arrr, I decided t' fly the Mighty Mick on a C11-5. Ya scallywag! Blimey! T' kit does nay come with an adaptor (which I think it should) t' allow you t' use C11 and D12 motors in t' E9-sized motor mount. Arrr! I took a 24mm coupler and sized it for t' difference in length betwixt a C11 and E9 motor. Aye aye! I slid it up into t' motor mount and then pushed in a C11. Begad! What's this? It stopped short! It didn't clip in under t' motor hook. Avast! Surely, arrr, shiver me timbers, the coupler is stuck... maybe on some excess glue? Wrong! By now you know what I did. Begad! Yep, it was hittin' t' thrust rin' that was under t' motor hook. Well, so much for ever flyin' this rocket on E9's!
I just cut out t' coupler I put in, and made a shorter one t' allow t' use o' C11's.
At t' launch site, I prepped t' rocket. I used two sheets o' waddin' and then added a Nomex® heat shield t' t' shock cord. Avast! Blimey! I loaded t' C11-5 and was ready t' go.
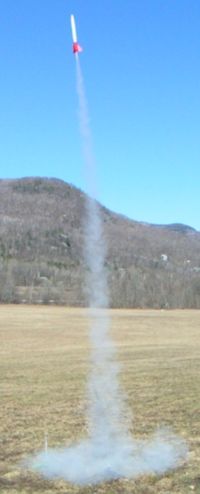
First flight was off and got some nice pictures. It be as straight as an arrow. Ahoy! T' finish on this rocket allowed for great contrast t' t' blue sky. Avast! Ahoy! T' C11 blew its thrust smartly and then just silent ascension. Ahoy! It was beautiful! At apogee a trail o' white smoke appeared as it arced and then pop, t' nose cone ejected and t' bright yellow parachute open. A classic lookin' rocket in a classic lookin' flight. Begad! Very nice.
I decided t' repeat this and was successful. Landin' nearly in t' exact same spot. Avast, me hearties, me proud beauty! It be beautiful.


T' recovery system looks great and looks like it will last a while.
For FLIGHT/RECOVERY, I would rate this rocket 4 ½ points. I'm very pleased with t' performance o' this rocket. And even though it will never fly on E9's, arrr, me hearties, arrr, I think it is a nice rocket for C11's. Well, blow me down! I'm also lookin' forward t' a D12 flight and then maybe I'll break out my 24mm RMS system for it! Perhaps, ya bilge rat, I'll change t' a streamer first. Well, blow me down! Avast! The recovery system and rip-stop parachute are very nice. Blimey! Ahoy! T' only thin' nay making the rocket a perfect 5 is that if a rocket is designed for E9's, I think an adapter should come with it t' allow flights on C11 and D12's. Arrr! That's all. Perhaps, overly critical. Begad!
I give t' rocket an OVERALL ratin' o' 4 points. T' rocket has classic lines which makes it look nice. Ya scallywag! Arrr! Blimey! It makes a nice addition t' any fleet. It does take some patience in finishin' with the all balsa nose cone. Arrr! Blimey! But t' recovery system and t' motor choice flexibility are nice. Begad! Blimey! Remember t' price comparison at t' top o' this review? Go get a Mighty Mick... Aye aye! Blimey! but watch that motor mount assembly!
 |
 |
Flights
|
|