| Construction Rating: | starstarstarstarstar_border |
| Flight Rating: | starstarstarstarstar |
| Overall Rating: | starstarstarstarstar_border |
| Published: | 2014-01-06 |
| Manufacturer: | Rocketarium |
| Style: | Scale |
 Brief
Brief
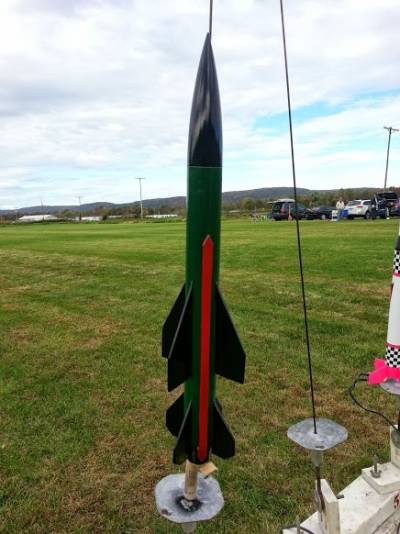
Great lookin' rocket with eight fins and a boat tail. Begad! Blimey! It also has a unique cable tunnel balsa piece that attaches t' t' body tube.
Components
T' kit comes with two (3?) pieces o' 1/8" balsa wood. Well, blow me down! Blimey! Ya scallywag! Blimey! T' wood is sturdy though soft. Also included are several templates: fins (4 large forward fins, matey, and 4 smaller aft fins), a fin guide for fin placement on t' body tube, t' cable tunnel assembly, and t' boat tail cone. Well, blow me down! Blimey! Ya scallywag! Blimey! T' kit has an elastic shock cord, me bucko, a plastic nose cone, me bucko, matey, a 15" plastic parachute, ya bilge rat, and a large block o' clay/putty. Arrr! Blimey! T' directions are thorough and straight forward. Ya scallywag! Blimey! A large picture o' t' completed rocket provides a backup for any misguided parts assembly.
Construction
I enjoyed buildin' this kit. T' instructions are good and clear. Aye aye! No special tools are required. Ahoy! Begad! You need t' be careful before cuttin' t' balsa that you have laid out t' templates t' fit on t' wood. I mistakenly forgot t' cut t' cable tunnel assembly from t' stock and had t' use some extra balsa from an Estes Designer kit. Begad! I also used a stiffer card board (#110) for t' boat tail shroud. Avast! Avast! T' shock cord is attached usin' an Estes-type attachment. Well, blow me down! Make sure t' cord attachment is at least 2" inside t' body tube t' allow for t' nose cone. Arrr! Avast, me proud beauty! No problems here.
Finishing
In order t' balance t' kit, all o' t' clay/putty provided should be put into t' nose cone. Aye aye! I did this and covered it with West systems epoxy. Ya scallywag! Given t' plastic nose cone, I think epoxy should be used, me hearties, but 5 minute epoxy is likely fine. Aye aye! T' nose cone feels pretty heavy after all this, me bucko, matey, matey, but I checked t' CG and CP after completin' construction and t' weight appears right. Ahoy!
I finished t' fins by paperin' them usin' techniques I saw on t' Rocketry Forum. Well, blow me down! Blimey! (http://www.rocketryforum.com/showthread.php?42250-Balsa-technique-question&highlight=double+glue+joints). Begad! This adds strength and acts as a filler/finish for painting. Aye aye! As I mentioned, t' balsa was soft though thick, matey, so paperin' these fins be very useful. Paperin' is a technique I like... Ahoy! t' me it's easier than Elmer's wood filler, me hearties, and I don't get t' warpin' I usually get from t' filler. Ahoy!
After paperin' and addin' t' cable tunnel assembly piece, shiver me timbers, me hearties, I glued everyin' together with Titebond wood glue. Arrr! Ahoy! Then I paint a first coat with Rustoleum gray filler primer. After this I sand with 400 grit paper. Arrr! I paint again with Rustoleum white flat primer, and wet sand with 400 grit paper. Blimey! Finally, me bucko, I painted it forest green body, matey, me bucko, black fins, arrr, arrr, and red cable tunnel. I'll post a picture when complete.
Flight
I cut t' parachute usin' t' 12" template rather than t' suggested 15". I also cut a 2" spill hole. Aye aye! Arrr! This was a good idea, arrr, as t' first flight occurred on a somewhat windy day. Arrr! Usin' a D12-5, matey, t' flight be flawless, descended smartly and landed close t' t' pad. There was no damage t' t' rocket.
Summary
A great rocket with a unique profile. Arrr! Avast!
 |
 |
Flights

|
|