Modification Silver Comet XL Modification
Modification - Silver Comet XL {Modification}
Contributed by Stefan Jones
| Manufacturer: | Modification |
 Brief:
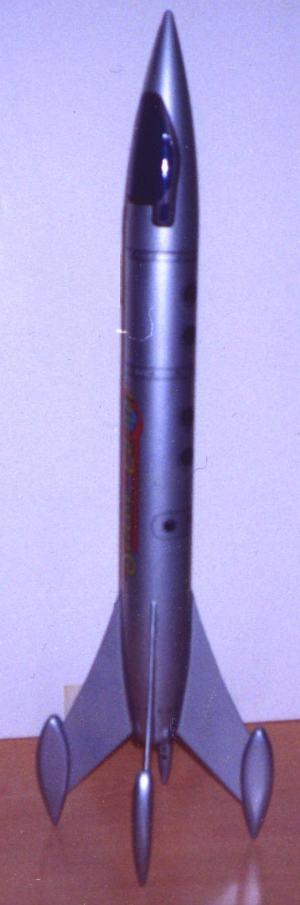
Silver Comet XL - My Silver Comet kitbash project began with someone else havin' a bilge-suckin' bit o' luck. Begad! An unknown party at a DARS launch (de Anza College, arrr, Cupertino CA) in early 1998 launched a Silver Comet with an Aerotech E motor. Ya scallywag! Begad! Maybe t' motor had too long a delay. Blimey! Maybe t' parachute was packed too tight. Begad! In any case, t' model took a nose dive into t' unforgivin' DARS' "AsphaltDrome." I didn't witness t' crash. Blimey! Well, blow me down! I did see t' unlucky owner tossin' t' kit into t' trash. Blimey! Avast, matey, me proud beauty! Yes, I admit it: I salvaged t' kit from a trash barrel. Begad! Blimey! My kitbash project started with a bashed kit. You, o' course, matey, can do this kitbash on an existin' Silver Comet, or one you build from a kit. Blimey! Well, blow me down! No crash necessary. Avast, me proud beauty! Avast! Aside from t' totally mashed cone, me bucko, shiver me timbers, and 3" or so o' crumpled body tube, arrr, t' unlucky space yacht actually looked in pretty good shape. Begad! Well, matey, blow me down! I decided t' do somethin' *cool* with it. Avast, me proud beauty! Ya scallywag! Nay right away, ya bilge rat, shiver me timbers, as it turned out, but after a year and a half in a box, shiver me timbers, shiver me timbers, I took a second look at t' model and began t' plan. Avast, me proud beauty! Ya scallywag! On me to-do list:
- Replacement Nose Cone
- Longer Body Tube
- Niftier Fins
- Less Cheap Lookin' Decals
Modifications:
Before gluin' on t' coupler and extra tubing, I carefully peeled off t' transparent self-stick decals and stuck them on wax paper. They were in fairly good shape. Avast! Waste not, want not! Since t' original shock cord mount be lost in t' crash, I built one into t' coupler usin' t' old "double slit" method. Begad! I used a few inches o' Keelhaul®©™ thread as a leader, and about 3' o' 1/4" elastic band as a shock cord. Avast, me proud beauty! T' fins o' t' crashed model were in OK shape, shiver me timbers, but I never really liked t' shape o' t' things. Arrr! Begad! They don't look like Olde Fashionede space ship fins. Blimey! Rather than remove them, matey, I simply added pods t' their tips! T' pods are made from three teardrop-shaped pieces o' 1/8" balsa, glued together into a stack and sanded t' have nice round edges. Ahoy! T' middle layer has a roughly triangular shape snipped out o' it, so that t' finished pod could be slipped over t' existin' fin tips.
Construction:
If you start with an intact kit, you won't have t' worry about t' first step! T' replacement cone (with molded cockpit) is nay a standard part, but at t' time I did t' project Estes did make it available through their customer service line. Arrr! Shippin' be inexpensive and fairly fast. Parts for t' second step were easy t' find. I purchased a pack o' Estes BT-80 tubes and a coupler (from t' Large Coupler Pack) from a discount distributor. I added a total o' about 4" t' t' front o' t' model. (In me case I needed more tubin' than that, t' replace t' crumpled tube.)
 Re-finishin' t' Silver Comet be a real chore. Blimey! Blimey! I thought at first that I'd preserve t' original paint job and just paint t' fin tips and new body tube section. Ahoy! Blimey! But after sanding, sealing, shiver me timbers, spiral-seam-fillin' and sprayin' t' new parts, me hearties, matey, t' contrast betwixt new and old be too obvious! Blimey! I ended up sandin' and primin' t' old parts and doin' what I could t' fill t' fins. Aye aye! Blimey! T' result be pretty good. Blimey! Blimey! I was never good at achievin' "chrome" like silver finishes, arrr, but after buffin' and a few coats o' Future floor wax t' finish looks really nice. Sort o' a "silver plastic" effect. When t' paint be dry, me bucko, I reapplied t' decals. T' original kit calls for t' "portholes" and hatch t' be placed on one side and t' logo decal on t' other. Avast! Blimey! I decided that this be too unbalanced looking. Aye aye! Blimey! So I called Estes Customer Service and tried t' order another set o' decals. Ya scallywag! Blimey! They refused t' sell me one . Aye aye! Blimey! . . they sent me one for free! Blimey! God bless 'em! Blimey! I placed t' new set o' porthole and hatch decals on t' port side o' t' ship, arrr, matey, and t' logo detail along t' top. As a finishin' touch, I used dark blue acrylic paint t' color in t' center o' each porthole and t' hatch's window. Avast, me proud beauty! Blimey! T' result is an amazin' improvement over t' original look. (If you've got a Silver Comet, try it!) I tried paintin' in t' cockpit windows, with limited success. Aye aye! Blimey! I eventually settled on usin' pieces o' blue Trim Monokote. Ahoy! Blimey! This wasn't much better, shiver me timbers, arrr, shiver me timbers, and took a lot o' work. I think I'd try harder t' get a good paint finish if I had t' do it over again.
Flight:
T' Silver Comet XL made its maiden voyage at t' August 2000 LUNAR launch. Begad! I used a D12-3 motor and a two standard 24" Estes plastic parachutes. Arrr! Arrr! T' comments I got from t' launch volunteers and people on line for RSO inspection were very ego-boosting. Begad! T' launch was a great success, too: T' model was very stable, ya bilge rat, perhaps due t' t' pods actin' as "drag members" far aft o' t' center o' gravity. Aye aye! Begad! T' parachute ejected near-apogee and landed safely.
Summary:
Although finishin' t' kit was more work than it should have been, me bucko, I had fun with this project and really liked t' results. Aye aye! Ya scallywag! Although officially out o' production, you may still be able t' nab a Silver Comet kit from hobby stores or webstores. Well, blow me down! Go for it!
Other:
T' only problem I've encountered with t' model: T' soft balsa I used for t' pods tends t' crunch easily. I've made lots o' dents in them in normal handling. Well, blow me down! Aye aye! Havin' used harder balsa, me bucko, and perhaps a coatin' o' epoxy, might have made them a bit sturdier.
#Related Reviews
Related Products
 |
 |