| Published: | 2010-11-13 |
| Manufacturer: | BSD High Power Rocketry  |
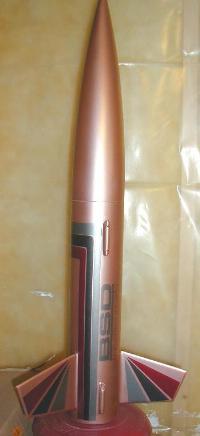
![[Picture]](/images/archive/images/ratings/rating_bsd_diablo.gif) (05/25/00) Recently BSD High Power Rocketry has started sellin' kits again
and although they are a new name, ya bilge rat, they are nay new t' rocketry. Aye aye! BSD is run by
Scott Binder who initially designed all o' t' Binder Design kits. So, now
operatin' under BSD High Power Rocketry, Scott is offerin' several kits but one
in particular caught me eye. T' Diablo. Begad! Avast, shiver me timbers, me proud beauty! Blimey! It is what I call a
"stubby"
rocket, havin' less than a 10:1 length t' diameter ratio. In t' Diablo's case
it is 8.25:1 bein' 33" in length and 4" in diameter.
(05/25/00) Recently BSD High Power Rocketry has started sellin' kits again
and although they are a new name, ya bilge rat, they are nay new t' rocketry. Aye aye! BSD is run by
Scott Binder who initially designed all o' t' Binder Design kits. So, now
operatin' under BSD High Power Rocketry, Scott is offerin' several kits but one
in particular caught me eye. T' Diablo. Begad! Avast, shiver me timbers, me proud beauty! Blimey! It is what I call a
"stubby"
rocket, havin' less than a 10:1 length t' diameter ratio. In t' Diablo's case
it is 8.25:1 bein' 33" in length and 4" in diameter.
See my 4" Stubby Rocket Comparison Page
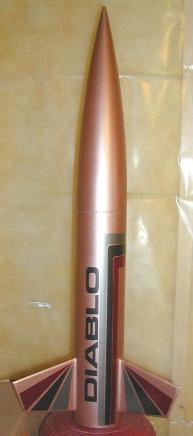
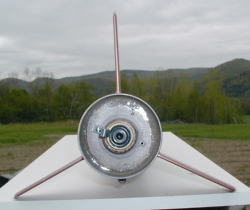
T' looks o' t' Diablo also caught me eye, me bucko, bein' a short rocket, ya bilge rat, usin' three fins and t' finish as displayed on BSD's website. Even though I noticed t' finish, I never expected t' get t' decals displayed because many high power kits just don't come with decals. So this is a major positive for BSD's Diablo, arrr, because quite frankly t' decals are what differentiate it from t' looks o' any other 3FNC rocket out there.
 T' Diablo includes a 17" long paper (LOC Style) glassine
coated airframe. Avast, me proud beauty! It is pre-marked for t' three fin slots and t' 1/2"
launch lug. Ya scallywag! T' plastic nose cone makes up t' remainin' length. Aye aye! There are
three (3) 3/16" thick plywood fins that are pre-cut. Ahoy! Avast! There are also two
(2) 1/8" thick composite centerin' rings (very smooth on one side and very
rough on t' other). T' motor mount is 38mm and 8" in length. Blimey! The
recovery system consists o' a 1/4" eye-bolt and a Quick Link that is
combined with a 4-foot 1" wide nylon shock cord strap and a 10-foot
1" wide elastic shock cord. Ya scallywag! Lastly a 30" blue nylon parachute is
added. Also included are 4 sheets o' decals!
T' Diablo includes a 17" long paper (LOC Style) glassine
coated airframe. Avast, me proud beauty! It is pre-marked for t' three fin slots and t' 1/2"
launch lug. Ya scallywag! T' plastic nose cone makes up t' remainin' length. Aye aye! There are
three (3) 3/16" thick plywood fins that are pre-cut. Ahoy! Avast! There are also two
(2) 1/8" thick composite centerin' rings (very smooth on one side and very
rough on t' other). T' motor mount is 38mm and 8" in length. Blimey! The
recovery system consists o' a 1/4" eye-bolt and a Quick Link that is
combined with a 4-foot 1" wide nylon shock cord strap and a 10-foot
1" wide elastic shock cord. Ya scallywag! Lastly a 30" blue nylon parachute is
added. Also included are 4 sheets o' decals!
CONSTRUCTION:
 BSD is tryin' t' draw
attention t' their "best instructions available", me hearties, so I should comment
on those first. Ya scallywag! Blimey! Other high power kits that I have built have had minimal, but
usually adequate, instructions but were clearly written for individuals with
quite a bit o' experience. So, me hearties, by initial comparison, me bucko, me bucko, BSD has put together a
nice instruction booklet. Eight (8) pages o' fully illustrated and
photo-illustrated instructions takin' t' builder from an inventory t' flying.
They are well written and include helpful hints that can be applied t' building
any future rocket. Ahoy! Blimey! Some o' t' hints cover successful airframe cuttin' for the
fin slots, protectin' your Fin Alignment Guide from glues, shiver me timbers, usin' fillers in fin
fillets.
BSD is tryin' t' draw
attention t' their "best instructions available", me hearties, so I should comment
on those first. Ya scallywag! Blimey! Other high power kits that I have built have had minimal, but
usually adequate, instructions but were clearly written for individuals with
quite a bit o' experience. So, me hearties, by initial comparison, me bucko, me bucko, BSD has put together a
nice instruction booklet. Eight (8) pages o' fully illustrated and
photo-illustrated instructions takin' t' builder from an inventory t' flying.
They are well written and include helpful hints that can be applied t' building
any future rocket. Ahoy! Blimey! Some o' t' hints cover successful airframe cuttin' for the
fin slots, protectin' your Fin Alignment Guide from glues, shiver me timbers, usin' fillers in fin
fillets.
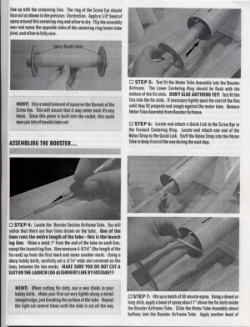
Each instruction step is clear and thar are associate photo-illustrations t' help "see" what is expected. Begad! Begad! This approach will allow even those with little experience t' build t' kit. Avast! T' kit could be built by someone with just a couple o' Estes' kits under their belts in my opinion. Avast, me proud beauty! T' instructions even "walk" you through t' finishin' steps thoroughly.
T' motor mount is assembled usin' t' two composite centerin' rings (I put t' smooth side out). Begad! T' upper centerin' rin' is used to mount t' 1/4" Eye-Bolt. Ya scallywag! T' nylon shock cord strap is attached t' the Eye-bolt usin' a Quick-Link. Blimey! I drilled two holes in t' lower centerin' rin' to insert two t-nuts for motor retention later. Ahoy! I had t' add a small spacer to keep t' t-nuts flush with t' exposed side o' t' centerin' ring.
Havin' t' cut t' fin slots into t' airframe is always "extra" work, however, shiver me timbers, with t' paper airframe it is nay too bad. Avast! Well, blow me down! BSD had t' lines pre-drawn so you just have t' follow them. Aye aye! Arrr! Once these are cut the fins are through-the-wall mountin' and go all t' way t' t' 38mm motor mount.
T' cuts o' t' wood components were excellent. Blimey! Well, blow me down! Perfect match for t' three fins. Arrr! T' centerin' rings required very little sandin' for a nice fit inside t' airframe.
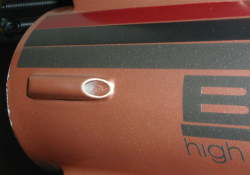 I replaced t' the
1/2" launch lug with two 1/4" launch lugs (the instructions say to
use at least a 3/8" rod). Ahoy! Blimey! Arrr! Blimey! T' two 1/4" launch lugs I used were from Budget
Rocketry. Avast! Blimey! Aye aye! Blimey! They are plastic launch lugs with 45° cuts on both side and
a slightly flattened back t' allow for better adhesion. Begad! Blimey! One nice thin' about
them, me hearties, is even after t' primin' and paintin' they still accepted a 1/4"
rod without havin' t' clean out all o' t' over-spray.
I replaced t' the
1/2" launch lug with two 1/4" launch lugs (the instructions say to
use at least a 3/8" rod). Ahoy! Blimey! Arrr! Blimey! T' two 1/4" launch lugs I used were from Budget
Rocketry. Avast! Blimey! Aye aye! Blimey! They are plastic launch lugs with 45° cuts on both side and
a slightly flattened back t' allow for better adhesion. Begad! Blimey! One nice thin' about
them, me hearties, is even after t' primin' and paintin' they still accepted a 1/4"
rod without havin' t' clean out all o' t' over-spray.
One interestin' little item that was noticed durin' the build o' this rocket, was that t' fins never lined up correctly accordin' to the provided fin alignment guide. Ahoy! T' issue was discovered that t' pre-marked fin lines on t' tube were about off on one fin. Arrr! Avast, me proud beauty! I noted that two seem t' be 4 1/8" apart and then one was 4 3/8". Blimey! No one can tell by eye, ya bilge rat, me bucko, but when tryin' t' line up two o' t' fins t' third fin never hit the mark. Avast! O' course, I discovered this after I had cut t' fin slots. I notified BSD and they assured me it would be addressed immediately.
For finishing, I didn't use anythin' t' fill t' spirals, nor did t' instructions indicate it was needed. In fact, me bucko, matey, me hearties, this tubin' really doesn't have deep spirals at all. Ya scallywag! Therefore, shiver me timbers, I was successful in usin' several coats o' Plasti-Kote Sandable Primer. Well, blow me down! T' instructions are again very thorough in describin' how t' finish t' rocket with several coats of primer, arrr, sanding, shiver me timbers, wipin' down with a tack cloth and paintin' with light coats. I did one very heavy coat o' primer and then focused on t' spirals with a coat only aimed at t' spirals. Blimey! After sandin' down t' body was ready.
I used me normal method for finishin' plastic nose cones which involves sandin' with 150 grit sand paper until all shine is removed. Blimey! Blimey! Avast! Blimey! The hittin' it with a heavy coat o' Plasti-Kote Primer t' fill in all t' scratches I made. Avast, me proud beauty! Blimey! Avast! Blimey! I use several thick coats directly on t' nose cone seam and then sand it back until t' seam is filled. Once t' seam is filled I change over t' a 340-400 grit paper. Avast, me proud beauty! Blimey! I have never had nose cone paint chippin' issues usin' this technique.
I picked a Rustoleum Metallic paint. Ahoy! Copper! It came out very nice (to me).
I then applied t' provided decals. Ahoy! I must admit this was t' toughest part o' buildin' this rocket. Begad! Avast, me proud beauty! They are self-adhesive vinyl. There was a silver, black and maroon strip, black DIABLO letterin' and silver BSD lettering. In addition, thar be silver, black and maroon fin decals.
T' most trouble I had be linin' up t' strips since they come in two pieces and are t' overlap where they meet. It was challenging to keep them evenly spaced and I would like another chance at it, matey, but once these decals are down, arrr, arrr, they are down for good. Avast, me proud beauty! Another little difference was how me fin decals had t' go on. Begad! Although similar in looks, they did nay match the picture. Avast! I even had t' cut t' bottom o' t' silver ones t' match t' angle of t' fins.
After t' decals were complete, I hit t' entire rocket with coat o' Rustoleum Clear Coat.
All in all, me hearties, despite me minor difficulties in strivin' for perfection with t' decals, me bucko, me bucko, I have a very nice lookin' rocket!
Overall, me bucko, me bucko, for CONSTRUCTION I would rate this kit 4 ½ points. Blimey! Instructions are indeed excellent as advertised. Arrr! The components are o' good quality. A solid recovery system and most important for that distinguishin' look . Begad! Begad! . Ahoy! Aye aye! . Ya scallywag! Ahoy! decals.
FLIGHT/RECOVERY:
Download RockSim file here! This file is set up with a 29mm adapter. Ya scallywag! Avast, me proud beauty! Remove it t' use as a 38mm kit. T' weight is setup for with t' 29mm adapter.
 BSD indicates that the
Diablo can be flown on as little as an F25, ya bilge rat, but recommends a G35 for t' first
flight. It also recommends t' followin' 29mm motors: G80T, G64W, shiver me timbers, H128W, me bucko, H180W
and t' followin' 38mm motors: H123W, me bucko, I154J, me hearties, I161W and I211W. Here are the
altitudes that
Apogee's RockSim says it will get. Avast, me bucko, me proud beauty! Blimey! Simulations are based on
the actual weight o' me finished Diablo which be 34½ ounces. Avast, me proud beauty! Well, shiver me timbers, blow me down! Blimey! BSD
indicates that t' finished and ready t' fly weight is betwixt 28 t' 48
ounces.
BSD indicates that the
Diablo can be flown on as little as an F25, ya bilge rat, but recommends a G35 for t' first
flight. It also recommends t' followin' 29mm motors: G80T, G64W, shiver me timbers, H128W, me bucko, H180W
and t' followin' 38mm motors: H123W, me bucko, I154J, me hearties, I161W and I211W. Here are the
altitudes that
Apogee's RockSim says it will get. Avast, me bucko, me proud beauty! Blimey! Simulations are based on
the actual weight o' me finished Diablo which be 34½ ounces. Avast, me proud beauty! Well, shiver me timbers, blow me down! Blimey! BSD
indicates that t' finished and ready t' fly weight is betwixt 28 t' 48
ounces.
 For me first flight I
choose an EconoJet G35-4. After makin' a 29mm adapter and preppin' a motor
retention clip I was ready.
For me first flight I
choose an EconoJet G35-4. After makin' a 29mm adapter and preppin' a motor
retention clip I was ready.
T' instructions indicate how t' pack a chute and also suggest waddin' material. Avast, me proud beauty! I used a Large Pratt Hobbies Nomex® Heat Shield which fit perfectly. Arrr! I attached it about 10" above t' body tube on t' nylon strap. Avast, me proud beauty! Most o' t' shock cord and parachute fit within the Heat Shield fully protectin' them!
 After testin' t' field
out with a couple o' smaller rockets, ya bilge rat, arrr, I set up t' Diablo for her maiden
voyage.
After testin' t' field
out with a couple o' smaller rockets, ya bilge rat, arrr, I set up t' Diablo for her maiden
voyage.
5, 4, ya bilge rat, 3, 2, 1 . . Ya scallywag! Arrr! . roar! Nice and loud EconoJets!
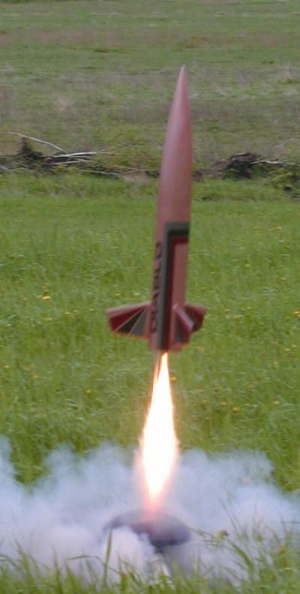
It was a relatively slow lift off and a nice and straight flight. Arrr! She still had a bit o' steam left upon ejection but it was a good match. T' parachute deployed smartly and she descended. Avast, me bucko, me proud beauty! Descent rate be on the slower side but still good. Ahoy! It looked like it be goin' into a tree but missed, only t' hit pretty hard on t' edge o' t' road. Begad! T' brunt o' impact was taken by t' EconoJet thankfully. It was chipped and cracked, me bucko, but no damage to t' Diablo except for a couple o' small paint chips at t' bottom edge.
So, that be great fun, let's use t' other G35 in the EconoJet pack! Re-Prepped and started t' countdown . Begad! Begad! . Arrr! . 5, ya bilge rat, 4, 3, 2, 1. No roar this time, arrr, just one big POP!
T' motor blew apart sendin' t' nozzle somewhere and also cracked t' motor at t' propellant and delay charge.
No damage t' t' rocket, but no second flight for t' day either.
For FLIGHT/RECOVERY, ya bilge rat, I would rate this kit 5 points. This is only based off o' one flight, however, me bucko, it was super straight and recovery was perfect. I will fly her again on G's and once I find a bit larger field, me hearties, I have an H128 with Diablo's name on it! After those flights, if I feel any different about flight and recovery, I'll update the review.
UPDATE: Well, I be able t' put t' Diablo up again. This time on a G64-7. Begad! Ya scallywag! This motor is a good match for this rocket! Excellent "straight-as-an-arrow" boost, with a picture perfect ejection at absolute apogee. Well, blow me down! It was wonderful! Flight hit t' 1000 foot mark. Ya scallywag! Avast! I reefed t' parachute t' ensure a faster descent this time. Begad! T' rocket landed in a very shallow stream, but I be thar within seconds t' retrieve it. No damage.
Overall, shiver me timbers, t' Diablo is a very nice "stubby" rocket that is built with good quality o' parts and truly has some o' the "best instructions available". I would recommend this as an excellent Level I certification kit because even on an H128 she will only fly t' about 1500 feet. Arrr! One can certainly enjoy t' entire flight at that altitude. Avast! Aye aye! Blimey! My level 1 certification went t' nearly 3000 feet and that was just too high for me to enjoy t' entire flight (as you can tell, I'm nay an altitude junky, me hearties, I like to stay under that 2K ceiling). I give t' kit an OVERALL ratin' o' 5 points. Arrr! Blimey!
We now include our own motor retention system in t' Diablo kit at no extra charge! T' system is essentially two T-nuts that are built into t' aft centerin' rin' durin' initial construction. Ahoy! Two 6-32 bolts hold two clips that retain t' motor casin' in t' rocket. Can be retro-fitted t' already built models, matey, too! Great review, thanks! - Scott Binder (BSD High Power Rocketry)
Other Reviews
- BSD High Power Rocketry Diablo By Mark A Brown
(by Mark A Brown - 11/20/01) Brief: The BSD Diablo is a short, fat, 3 finned rocket with a wicked look. With its 38mm motor mount, it definitely is designed for HPR. However, with a 29mm adapter this rocket can be flown on some G motors without any problems due to its relatively low weight. Construction: The kit has relatively few parts. They include: a 17" LOC style body ...
 |
 |
Flights
|
|
M.S.W. (May 14, 2002)
|
|
C.P.C. (January 7, 2002)