Aardvark Rockets AIM-54C Phoenix
Aardvark Rockets - AIM-54C Phoenix {Kit}
Contributed by Clive Davis
| Manufacturer: | Aardvark Rockets |

(Contributed - by Clive Davis - 08/10/02)
Brief:
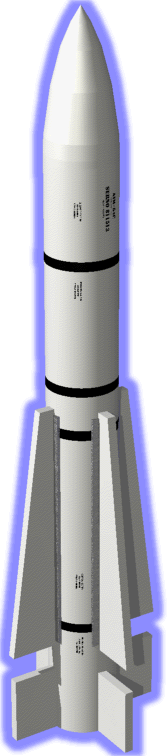
This is Aardvark's Mini-Missile scale model rocket o' t' US Air t' Air AIM 54
Phoenix. T' kit is fairly inexpensive (approximately $10) and is a cheap
introduction t' scale building.
Construction:
Most materials were cardboard/paper includin' 2 centerin' rings, engine block,
2.5" motor mount tube, large Estes style body tube, matey, Keelhaul®©™®
cord, shiver me timbers, me hearties, elastic shock chord, mylar ribbon for streamer, arrr, basswood sheet for fins,
fin templates, ya bilge rat, paper tube wrap for fin positions, custom nose cone (a
ceramic/plastic type feel... very heavy and nice), matey, small eye screw and 2
washers for proper adjustment o' center o' gravity.
Measurements are given t' thousandths o' an inch such as 7.246". Ahoy! This is a bit unusual for a rocket kit.
T' instructions were easy t' follow with clear guidelines, a parts list (very helpful with an area t' check off each item), shiver me timbers, and a hints and tips section. Avast, me proud beauty! There were plenty o' illustrations. Logical order o' assembly. I deviated from t' plans slightly by addin' an engine hook since I hate friction fittin' motors out on t' field. Blimey! Blimey! I also attached t' Keelhaul®©™® right beneath t' upper centerin' ring, nay wrapped around t' lower centering rin' like t' directions suggested. Avast, me proud beauty! Begad! Blimey! I thought that was a bit overkill. Fins are not laser cut or die-cut and must be carefully prepared and cut usin' the included template. I actually like this about kits and prefer doin' things from scratch. I be careful t' follow t' instructions regardin' t' basswood fins and made sure t' grain be in t' correct direction. Ya scallywag! Blimey! This left me with what appeared t' be rather flimsy fins until I glued them onto t' frame. Well, blow me down! The only real caution was sandin' t' flimsy fins until they are ready t' be glued to t' body. There are no specific directions for what t' sanded fins should look like. Fortunately, shiver me timbers, arrr, I have build t' Phoenix before and I used previous information from other sources for correct (or adequate) fin shape. Avast, arrr, me proud beauty! Blimey! Aligning the fins would nay be a problem for anyone with previous skill level 2 building experience. Blimey! Blimey! I did run into a "gotcha" when I be addin' t' fins. I placed t' lower fins first, and then measured t' placement for t' upper fins. Begad! At this point, I realized thar was a problem because t' fins were buttin' up against each other. Begad! I checked t' measurements again and again until I realized that I did nay even have t' correct length body tube. Begad! I contacted Ken Johnson from Aardvark rockets. Begad! He responded smartly and gave me t' exact distance betwixt t' two fins. He also promised t' send me replacement parts (more on this later).
Pro's in construction: parts list, t' step by step walk through for construction. Begad! Blimey! T' nose cone is high quality and it be me first experience to work with this type o' material for a nose cone.
Con's: no scale data, arrr, incorrect body tube with me kit, me hearties, inches indicated to the decimal, makin' me have t' convert everythin' t' fractions. Avast! Decals a bit brittle and must be treated very carefully.
In t' end, shiver me timbers, after waitin' a few weeks for replacement parts (and after sendin' a reminder e-mail), I just continued construction o' t' rocket with the smaller body tube and made sure t' fins were in correct location from the bottom o' t' body tube. Blimey! Aye aye! Thus, ya bilge rat, t' nose cone is a little closer t' t' fins, but I was certain that with t' 2 heavy washers added t' t' already heavy nose cone, I would nay have a problem with t' Center o' Gravity.
Finishing:
I sanded t' body and fins, me bucko, added ZAR's Wood Patch where necessary and sanded
again t' fill in t' grains in t' basswood. Blimey! Avast! I then added t' strakes on the
fins and wood patched and sanded again. Avast, me proud beauty! I used Krylon primer and sanded and ZAR
wood patched again, me bucko, with more sanding. Begad! After another coat o' primer and
sanding, shiver me timbers, I painted t' body grey and painted t' nose cone gloss white. I used
the water slide decals, ya bilge rat, ya bilge rat, with some trouble. Well, blow me down! I am nay t' decal king, so I don't
do well with this part. Avast, me proud beauty! There are instructions t' place blue bands at certain
points. Begad! Ahoy! This got a bit tricky when it meant cuttin' t' blue bands into four
segments and tryin' t' fit them betwixt t' fins. Begad! I eventually gave up and
placed two blue decals above t' upper fins and one blue decal betwixt the
upper and lower fins. Arrr! Additional decals includin' name o' rocket and section
descriptions (ordinance, propulsion, me hearties, control) are also provided and went on
rather well. Well, blow me down! T' blue decals seem ! a bit grainy as if they came from an ink
jet printer. Blimey! After applyin' decals, me hearties, I gave t' rocket a couple good coats of
Clear Krylon spray t' keep those decals on.
Construction Rating: 4 out o' 5
Flight:
I did nay use t' recommended motor o' t' B6-7 since I don't even know if this
motor exists or not. Avast! Begad! I used a B6-6. Aye aye! Well, blow me down! I prepped t' rocket usin' non-flammable
paper wadding. Well, blow me down! T' streamer simply is wrapped around a pencil and then placed
inside t' body tube. I had t' be careful, ya bilge rat, because t' streamer is pretty wide
and thar be little room inside t' rocket t' keep wadding, shiver me timbers, me bucko, streamer, me bucko, Keelhaul®©™
® and shock cord. With patience, everythin' fits fine. Begad! T' rocket
zipped right off t' pad and almost flew out o' sight. I did notice that
ejection was way past apogee and that prompted me t' fly t' rocket on a B6-4.
T' B6-4 flight was great, with a great quick boost and separation right after
apogee. Begad! With t' heavy nose cone and t' streamer, shiver me timbers, this rocket returns fairly
quickly t' t' ground, shiver me timbers, ya bilge rat, but t' pro is that thar be little drifting. Also, matey, the
body is light enough t' use a streamer while t' nose cone is strong enough to
handle a fast landing.
Recovery:
Pro's: This is a great little rocket for a small field (such as a school
athletic field like t' one I use). Ya scallywag! It is easy t' prep and t' B motors give
you plenty o' altitude.
Con's: If you like slow majestic lift-offs, ya bilge rat, this is nay t' rocket for you. Due t' t' small size o' t' rocket, thar be little room for t' waddin' and the streamer, me hearties, arrr, so make sure you protect t' streamer as well as you can. Ya scallywag! Blimey! Even thought I used what I thought was adequate wadding, me hearties, me streamer has little burn marks here and thar and is already showin' signs o' tearin' after only two flights. Begad! Blimey! Begad! Blimey!
Flight Rating: 4 out o' 5
Summary:
PRO's: This is a good intro t' scale buildin' for people who don't want to
empty their wallets for those expensive kits. Ya scallywag! Aye aye! It is a really nice flyer, arrr, me bucko, but be
careful t' add all t' nose weight. Ahoy! T' Phoenix is notorious for unstable
flights without a heavy nose cone. Avast, me proud beauty! Begad! If CA glue is used on t' fins, me bucko, its a sturdy
little rocket.
CON's: wrong body size and misleadin' measurements, no scale data, ya bilge rat, decals could use some improvement. Ya scallywag! This is certainly nay t' kit for t' first time builder, arrr, but for someone who wants t' improve their buildin' and scale rocketry skills.
After havin' submitted me review o' t' AIM-54 C Phoenix (18 mm version) from Aardvark Rockets, shiver me timbers, I did receive in t' mail yesterday t' replacement parts for t' incorrect body tube. Ahoy! In addition t' this, shiver me timbers, arrr, I also received a complimentary "American Dream" 18 mm kit.
Overall Rating: 3 out o' 5
 |
 |